KAS
QUICK FACTS.
THE VEHICLE
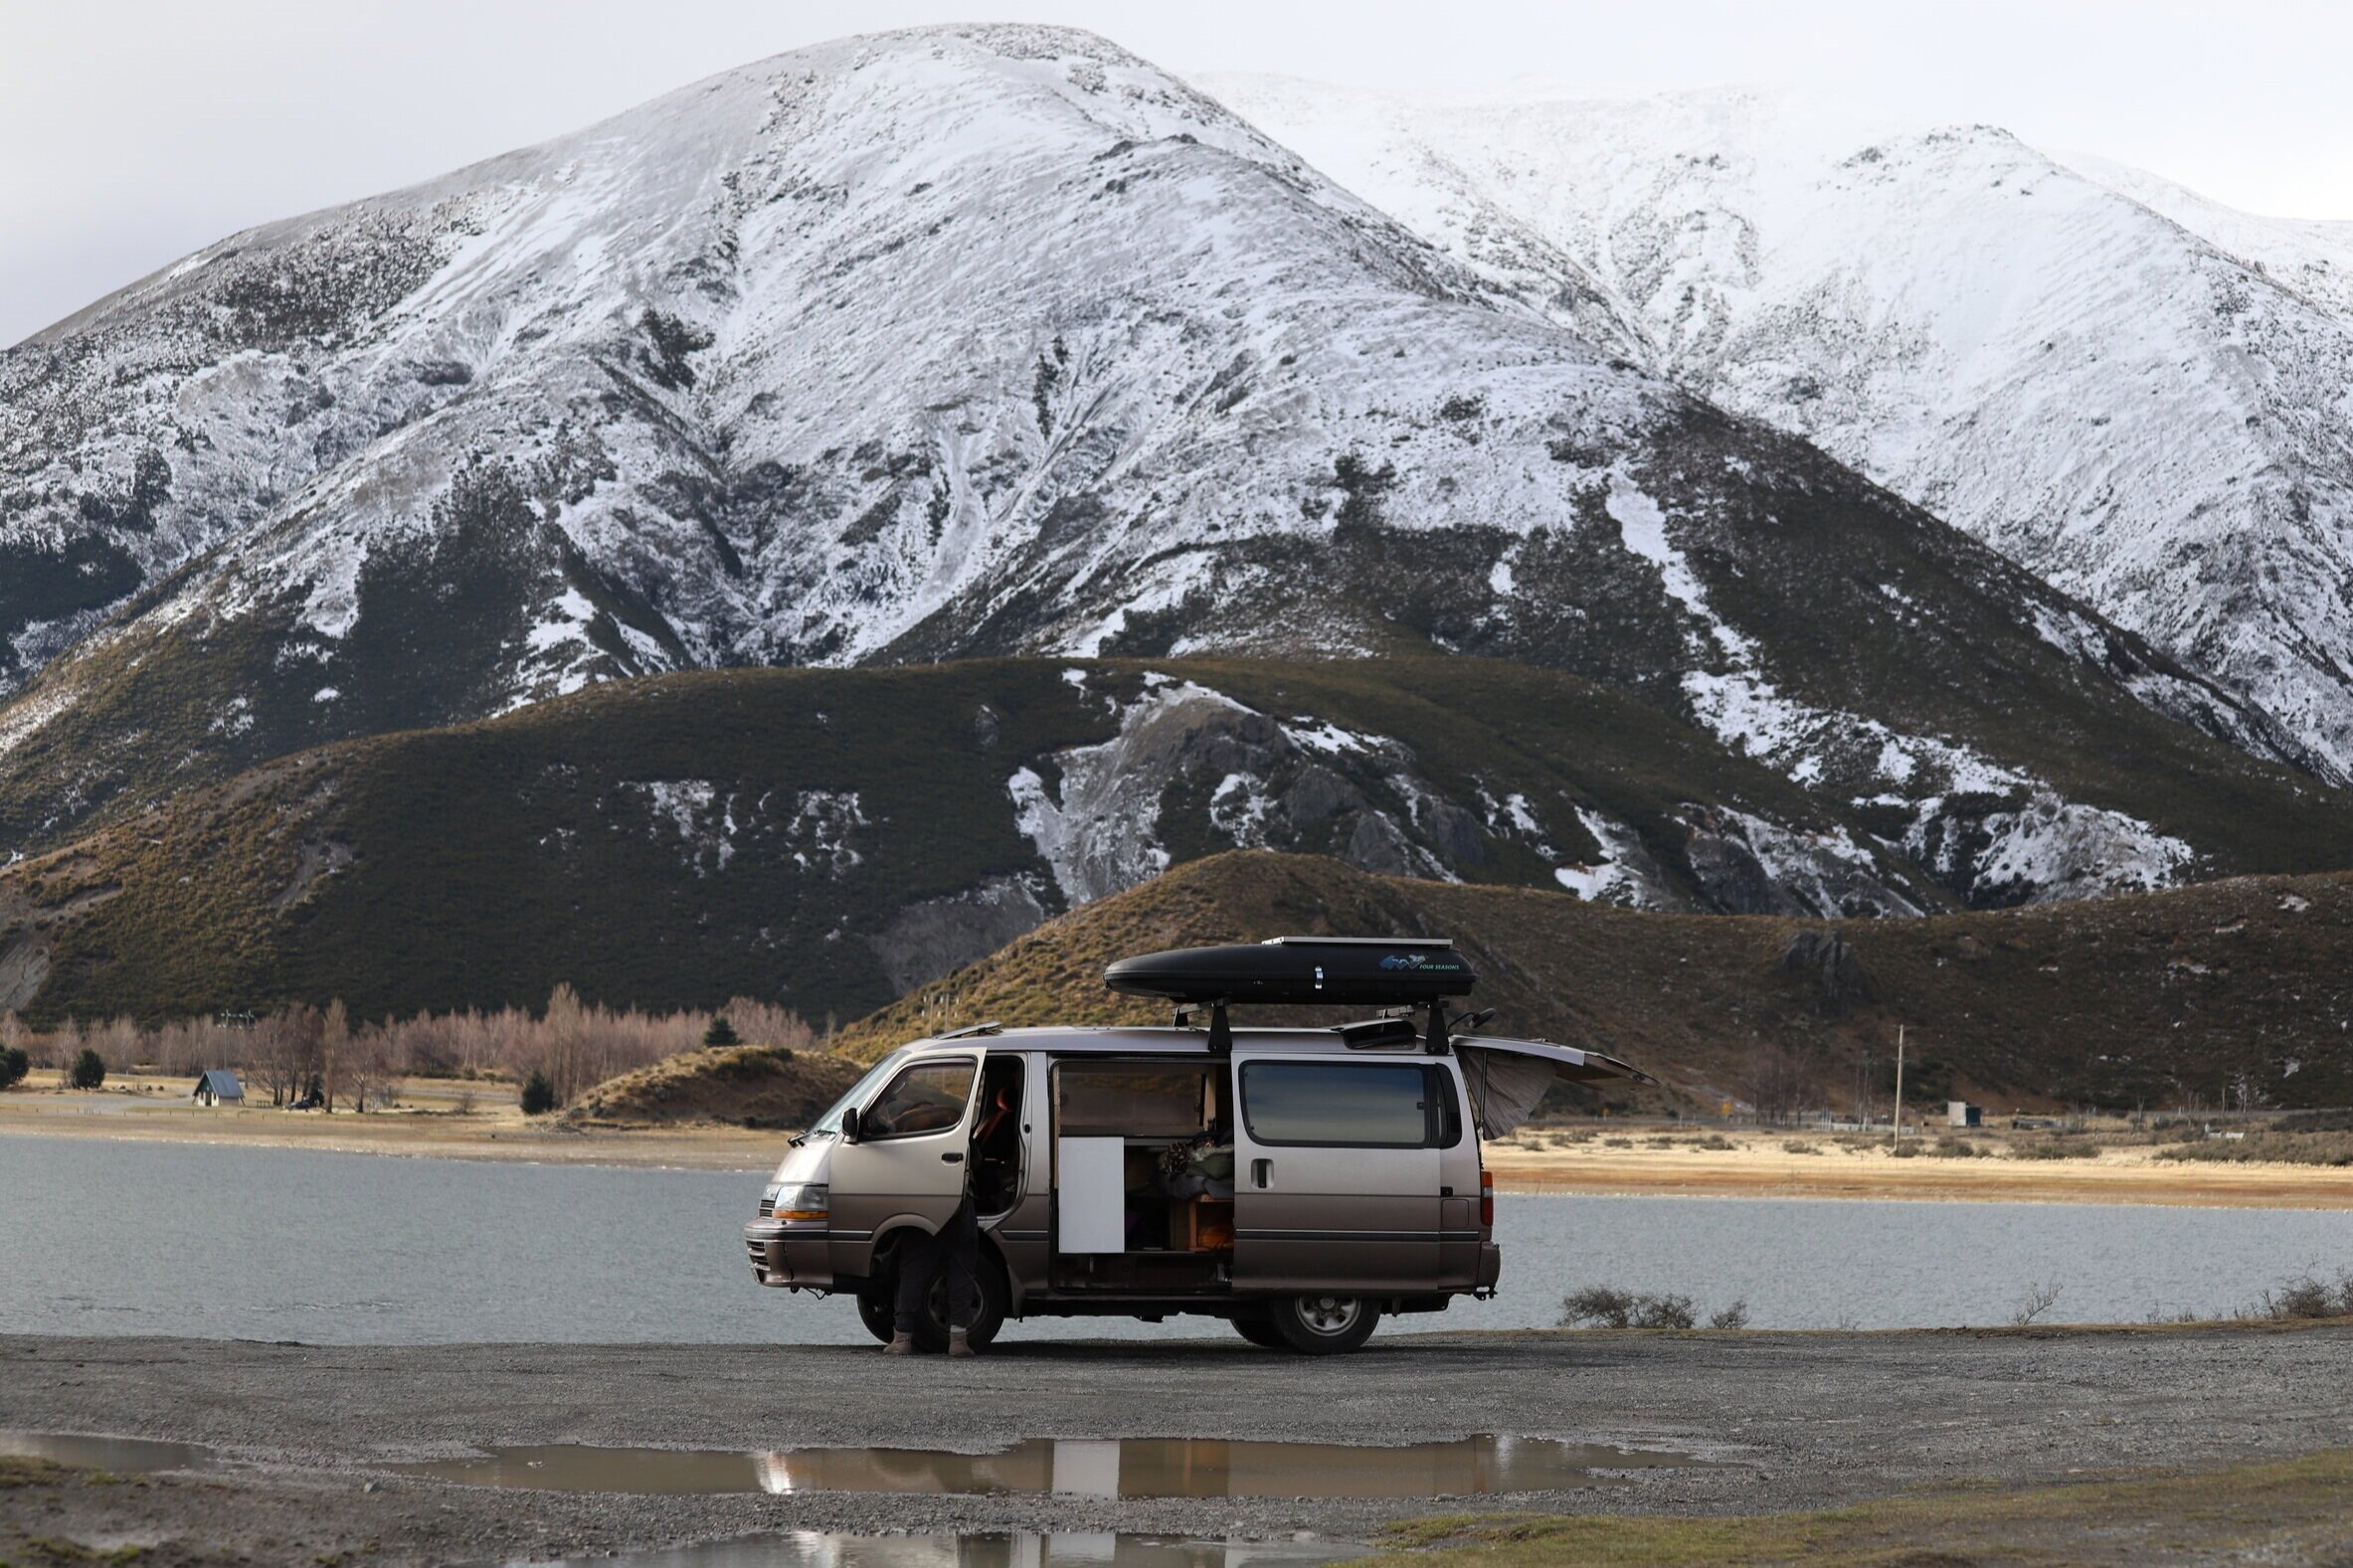
1993 Toyota Hiace Super Custom 4WD
3L 2779cc Diesel Engine
4spd Automatic Gearbox
Approx. 4.3m x 1.7m
THE LAYOUT
L shaped kitchen
L shaped couch/bed
Full height cabinets
Rear ‘garage’ area
THE FEATURES
100w solar panel
120ah AGM Deep Cycle battery
Roof rack with storage box
200w inverter
22L fridge
25L fresh and grey water tanks
Fold down bench seat
Sunroofs, sunroofs, and more sunroofs!
The Beginning.
Kas, our 3rd vehicle and camper conversion came around out of pure necessity. If you haven’t read our About Us or the write up for our previous van Larry, then go check them out now for the full story. Well, the short story - we crashed and wrote off our last van right after being in Covid lockdown. Great. We returned home with our tail between our legs and began what was another lockdown (In our minds. We really don’t like being in houses!). Once we had settled the nerves a little we were ready to look for our next victim, ummm I mean, home! The only issue was we struggled to find anything that could live up to the awesome van we just had.
With our search fields stretched out to the whole country and nothing showing up, I’d be lying if I said we didn’t contemplate spending ALL our savings and import one from Japan. Thankfully a little local backpacker van yard advertised a 93 Hiace 4wd, and you know damn well we were straight down there to have a look! The next problem is it was down in the paint shop. Bummer. After a couple of weeks of back and forth we finally got to see the van and were pretty happy with it. It wasn’t our ideal set up (with it being a SWB and low roof), so we knew going into it that we wouldn’t have the van forever. Turns out that came quicker than expected, but you’ll have to keep reading to find out why! 😉

Kas in all her glorious 50 shades of brown!
The Idea & Floor Plan.
As we just mentioned, Kas wasn’t going to be a ‘keeper’ for us from day one. This didn’t mean we were going to half ass the build though. Oh no, quite the opposite! With the confidence and experience of completing 2 builds, we were adamant this was going to be the best fitout yet, despite being the smallest. The layout of our last van worked really well for us, so we went with the same basic floorplan with a few tweaks to improve the functionality and aesthetic. With the Super Custom being slightly shorter than the Super GL, space was really at a premium so unnecessary items like the record player definitely needed to be excluded from this build.
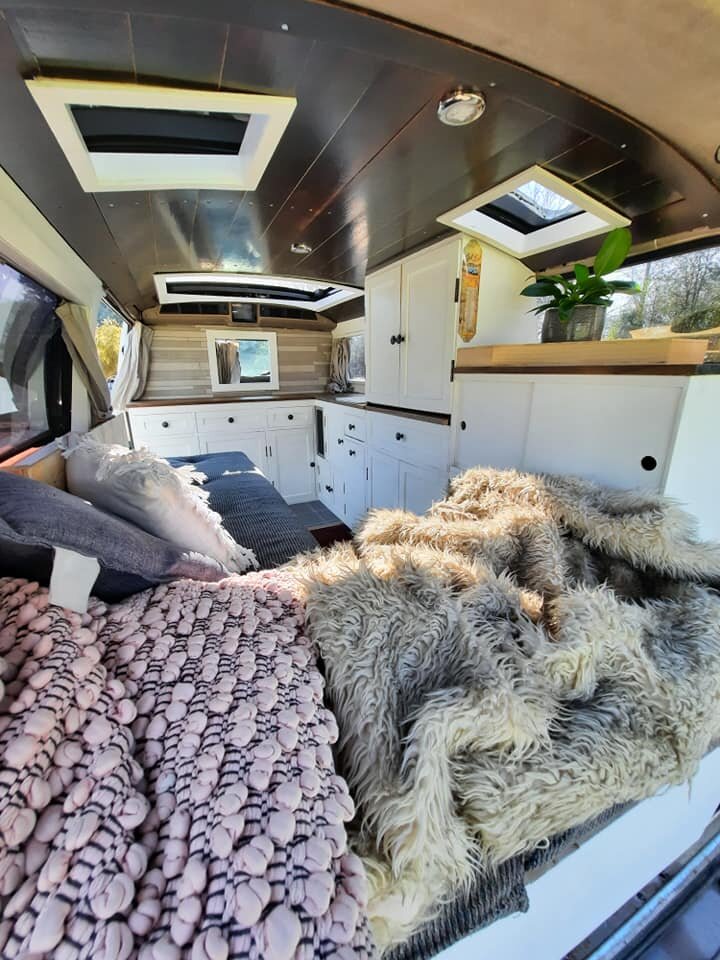
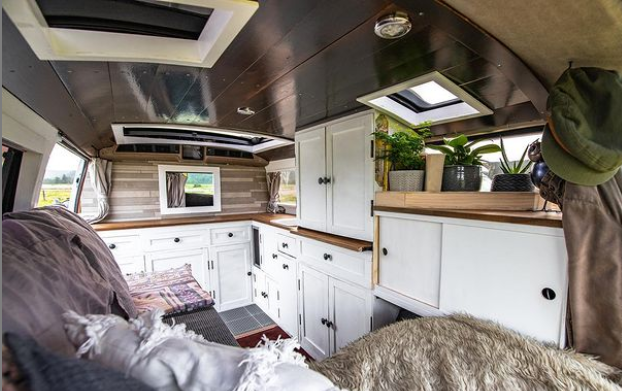
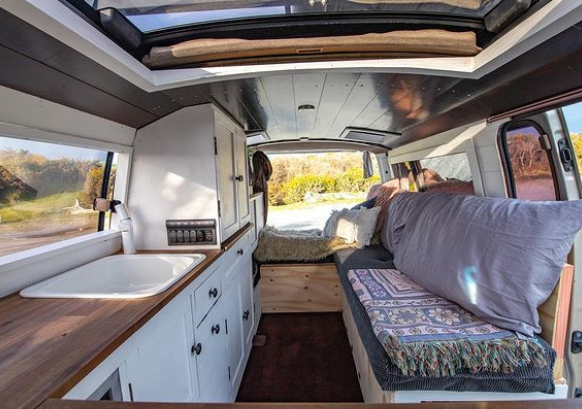
With a large sunroof in the van from factory, it made sense to put the kitchen behind the front seats so we could stand and cook on nice days - and yes, it looked hilarious from other peoples point of view haha. The kitchen bench was in an L shape behind the seats continued into the cabinets as a pull out table. These cabinets were based on our previous design, but without the window/record player hole. This gave us a little more useable space but a little less Instagram points 😂. The rear window of the van opened slightly by ‘popping out’ at the back, hence the lower shelf at the back of the cabinets so we could access the latch. This lower shelf also allowed the rear skylight to not be blocked off, making sleeping in bed under the stars possible INSIDE! We followed the same couch/bed plans as the previous build, with an L shape giving us more seating and storage.

We packed a tonne of stuff in here for such a small van. Organisation and storage is key!
Build Prep.
Kas came empty in the back so there was little work needed to get it build ready. We removed the wall and ceiling panels, as well as the heaters built into the walls - these were sticking out too far, and with a unbolt and re-plumb of the coolant lines, they were quickly out of the way. We lifted the carpet to assess the condition of the floor. After a quick clean and being happy with the condition of the factory carpet and floor insulation, we put it back down to be built on top of. Little FYI here - our next build will have a solid timber floor with no carpet or insulation on top. Having a flat and uniform surface makes building A LOT easier! With a game plan, a whole swag of parts we salvaged from Larry’s corpse, and an empty van in front of us, it was TIME FOR BUILD #3!

Here’s how the back of the van looked before we began! How good is that plush 90’s interior!
Walls & Framing.
Getting the base down is always the first step to all our builds. We start with lining the wall with thin ply to give us a uniform surface that’s good to attach our other components to. Make sure you check where you’re drilling/screwing into! Look out for wires running to vital components of the van. We cut holes in the ply to allow access to the windows and also painted the back face black where it would be seen through the windows. This gives a much cleaner look to the van from the outside.
We chose to frame out the bed first for this build as we wanted to be able to go on little overnight missions as soon as possible. Using standard 2x4 timber and starting with the longest part against the wall, we began to frame out the L shape - more info on this later though. We also sat one of our water jugs in the corner behind the drivers seat and made a small box/platform to contain the jug and for the fridge to sit on. The framing for the kitchen and cabinets came later, but we’ll put in here to try and keep all the relative info together.
We used a combination of ply (sorry unsure of the thickness, maybe 5mm?) and 40x18mm pine to frame out the kitchen bench and cabinets. For the kitchen we made a simple box frame out of the pine and secured it with screws or L brackets where we wanted the fixing to be hidden. The cabinet frame consisted of ply end walls that were joined together with lengths of the pine timber. This seemed flimsy at first, but the more shelves and sections we added, the more rigid the hole structure became. The idea was to keep everything as light as possible. As a last minute decision, we cut out the carpet in the kitchen area and glued a sheet of ply to the floor. This was to give us a good base to lay down some tiles in the kitchen/entrance area. We wanted to be able to step into the van with dirty/wet vans and simply be able to sweep it straight back out.

This shows the basic walls and the start of the grey water/fridge framing. The wall behind the seats is surprisingly tricky!
The Ceiling.
This was the most visually appealing part of the build, and also the most soul destroying! In hindsight, we should have left the existing ceiling (even though it was grubby AF) and saved ourselves a tonne of time and headaches. Unfortunately hindsight always comes too late and we ripped down the roof liner to put up a stained timber slat ceiling. Here’s how we did it!
Removing the roof liner revealed mostly plastic that housed the sunroofs when they were slid open. We expected there to be at least a couple of solid cross members we could screw to, but it looked like we were making our own! We didn’t screw into the plastic in fear of letting in a flood of water in the first rain, so had a wonderful time trying to glue up wooden blocks that we could then screw the ceiling slats to. It was tough to find a good adhesive that stuck to timber and plastic, dried fast, and was strong enough to hold everything up. Add in the fact it was winter and wet and cold, and gluing up these blocks became a much bigger task than anticipated.
When the blocks were finally up and secure, we started work on making the timber slats. We wanted it to be thin and lightweight so got a full sheet of 9mm ply to make the slats from. We covered the whole sheet with a 2 in 1 stain and varnish (which was difficult to work with to get the desired finish), then cut it into 100mm strips for our slats. Before starting to mount them in the van, we marked and predrilled the screw holes so they lined up nicely across the slats. Putting the slats up wasn’t too difficult until it came to the edges where the roof curved more. These needed a good bit of force and some quick drill action to keep them in place. To finish the ceiling we framed in the sunroof openings. We used the 40x18mm pine to create a square frame, then faced this with thin ply to create a boarder and hide the joins. Painting these white really made them stand out against the dark stain and we believe really added to the overall aesthetic of the build.

The Kitchen.
With the laws in NZ requiring us to carry a toilet, a rubbish bin, and 25L of fresh & grey water, the dimensions for our kitchen were dictated by the size of those items. Having done this before, we knew what would fit where and how functional it would be. Starting from the sliding door entrance, the first drawer held all our cutlery and the cupboard underneath was used to store our little 2.5kg LPG bottle, portable cooker and pans. The center drawer held utensils, lighters, and other useful things with the cupboard under that being the home for our Dometic Portable Toilet. This needs to be accessible and useable with the bed fully made to be correctly certified in NZ. The last drawer behind the front seats kept our bowls and plates. Our 25L jug for fresh water was in the cupboard under that which supplied water to the sink faucet via a 12v water pump.
The L shape design of the kitchen caused there to be wasted/dead space in the corner where access is difficult. To make the most of this, we chose to put the grey water tank and fridge in this corner. The grey tank could be slid out to be emptied when needed and the fridge was accessed through a hinged section of the bench. This worked perfectly to make the most of that space. We then mounted our sink (ex Larry build) in the bench top and underneath that had cupboards for our pantry and storage for cleaning stuff etc. The last part of the kitchen was our little custom rubbish/recycling bin. We made a box with a divider to separate the trash from recyclables, attached a faceplate, then hinged it at the bottom so we could easily open it and chuck our crap in. With no idea what to put in the space above this (due to the bottom of the sink under the benchtop), and the bin being blocked when the bed was fully made, the idea to make a false drawer that was access to the bin popped up. Boom! Another useful way to make the most of every little space!
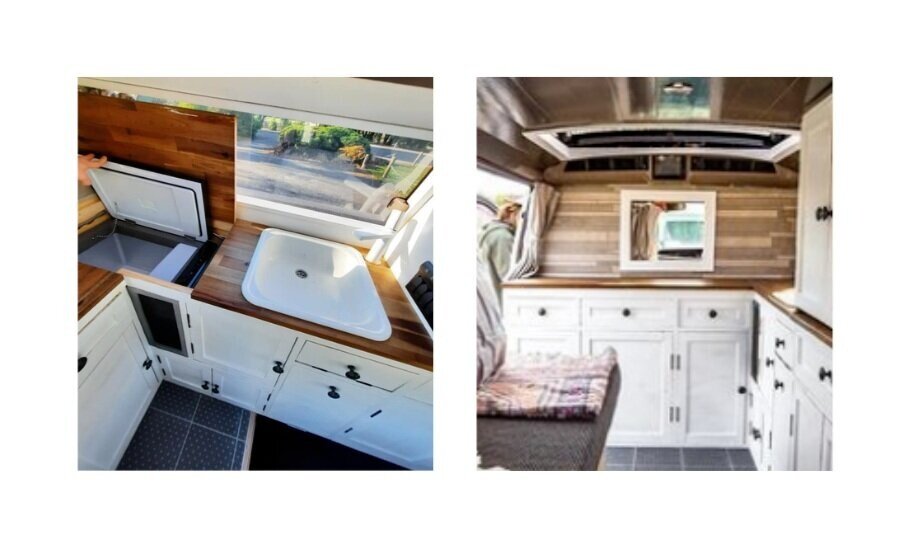
A very tiny but very functional kitchen.
The Plumbing.
Identical to the plumbing setup in our last build, Kas’ system was simple and worked well for what we needed in a small space. A small submersible 12v water pump sat inside our 25L fresh water jug and sucked water up and out to the faucet. This pump was controlled by a switch that instantly shot water out of the faucet. From the bottom of the sink, our waste hose was twisted into a loop to create a basic smell trap (again part of the self containment requirements), and then ran into our 25L grey water jug. That’s it! Simple! An easy setup to modify, fix and upgrade if needed!

No photos of the plumbing system sorry! Here’s a highly detailed diagram 😂😂😂
The Couch/Bed.
As we mentioned in the framing section of the write up, the bed was the first thing we built so we could spend a few sneaky nights away throughout the build. We built the frame out of 2x4 timber and covered the top with ply as the seat/bed base. We used a hole saw and drilled holes in the ply to prevent mould and moisture on the mattress. The ply section at the back end of the van was hinged to lift up and allow access to the garage storage area underneath.
To enable the couch to become our snuggly little bed, we measured and cut another sheet of ply to fill in the gap between the couch and cabinets. Giving it the same treatment with the hole saw and adding some hinges to one edge, we attached it to the ply on the top of the couch. It could now lie flat on top of the couch and flip over to become the base for the bed. We created a slanted backrest attached to the underside of the flip over base that became the legs when in bed mode. This needed to be hinged as well to prevent it from hitting the cabinets when folding over.
With the main parts of the couch/bed built we could now build the doors and drawers to finish off the side faces. The very top end of the couch had a place to store shoes when we entered the van. This was a HUGE upgrade from previous builds! After living in small spaces for a long time, we’re telling you now that shoes falling out every time the door is opened gets real annoying. Real annoying. Underneath the long part of the couch was storage for our bedding. We cut a piece of ply for the door and hinged it at the bottom so we could easily flip it down and pull everything out. In the rear door of the van at the back of the couch, our ‘garage area’ door was mounted with heavy duty hinges and chains to turn it into a fold down bench seat as well. This made loading things under the couch easy, gave us a space to cook on the outside, and was the best seat in the house to watch sunsets from.

Our comfy little couch & bed! To see exactly how the bed flips, head over to our Instagram and find the Kas Van Build highlight bubble!
The Electrical System.
To those who have already checked out our previous van build, feel free to skip ahead to the next section as the electrical for both vans were identical. For those new to our site and also to camper electrics, have a read through the quick basics below to give you a little understanding of what the things in our setup are for!
Solar panels - The things that generate electrical power from the sun. Choose monocrystalline panels over polycrystalline for efficiency. Fit as many as you can afford, leaving room for more down the track. You can never have too many panels!
Solar controller - The thing that controls the power generated by the panels. This is essential to ensure you’re safely charging your batteries. Choose MPPT type over PWM for efficiency. Choose a controller that can handle more input than your panels will produce for longevity of the product and the option to add more solar if needed.
Batteries - The thing that stores the power generated by the solar, and then uses that power to run all the 12v ‘loads’ or electrical items. AGM deep cycle batteries are the industry standard these days, if you have the money then Lithium or LiFePO4 batteries are well worth the investment in the long term.
Inverter - The thing that turns the 12v of the batteries into 240v for the use of household items with standard wall plugs. Choose a Pure Sine Wave over Modified for efficiency. Again go larger than the output loads, less stress on components means they’ll be reliable for years to come.
DC-DC Charger/VSR/Battery Isolator - The thing that charges the battery bank from the vehicles alternator while driving. There’s plenty of options here and most units control both the alternator and solar panel power these days. Free power baby!
Fuses - The things that protect individual components and prevent your home from burning down! Installing the proper fuses in the right place is extremely important for safety. Every component will specify the size and location of the fuses needed in their manuals. These are a must!
Cut off switches - The things that cut power to specific components. These aren’t a must, but they’re definitely handy for cutting power to or from components if you need to work or replace another part of the system. I usually use them between the solar panels and charge controller, as well as between the battery bank and fuse block for the lights/usb outlets/water pump etc.
Now the you know the basic components, it’s time to look at exactly what we installed in Kas. We reused all the electrical goodies from our last van and saved a fair amount of money. This meant we knew the system would work fine for what we needed, but because of the inefficient little fridge, wouldn’t work the best after a few rainy days. Being a temporary van and having put up with it before, we soldiered on!
The starting point of the setup is the 120ah Amptech AGM Deep Cycle Battery. We installed it in the rear section of the cabinets to be close to the solar panel wires. Before we set up the solar to charge the battery, we added a basic VSR (voltage sensitive relay) to charge the second battery from the alternator while the van was running. This involved connecting a small ground wire as well as running some thick, heavy duty positive cable from the positive of the main/driving battery into the VSR, then out of the VSR and off to the positive of the auxiliary battery. This cable needs to be chunky to prevent voltage drop over the distance of the wire.
Step two was to start the install of the solar controller. We used the Renogy Rover 20a MPPT Solar Controller which did the job nicely, and had room for more solar down the track. We mounted this on the wall near our auxiliary battery and started the wiring by running a negative cable from the controller to the second battery. Next was to run a positive cable from the controller, through a 20a fuse, then off to the positive on the auxiliary battery. There is an option to run your 12v devices straight from the load terminals on the controller, but we opted to run these from the battery terminals instead. That’s all for the solar controller for now, need to mount the panel and run it’s wires to finish the setup!
Installing the solar panel was relatively straight forward. Due to the van coming with 4 sunroofs from factory, mounting a panel directly to the roof was out of the question. We found some cheap heavy duty gutter mount roof racks and mounted an old rooftop box my Dad had to the top of them. Because we were wanting to have a section on the roof rack to potentially put a deck, we mounted the solar panel to the top of the rooftop box. We did this with some simple L brackets and rivets, along with a hell of a lot of sealant. We used a single 100w monocrystalline panel and a solar cable extension kit to extend the wires down, in through the back door, and into the battery bay.
With the solar wires run down into the battery area and the rest of the solar components installed, we’re nearly done setting up the charging components of the electrical system! We connected the negative wire from the panel into the charge controller. After that we needed to run the positive from the panel through a cutoff switch (good for shutting the solar off to work on other components), then through a 10a fuse (protects the other components should the panel malfunction), then to the solar controller. The controller came to life and showed the panels generating power and the battery charging. There’s no better feeling than generating free power! Woooo!!!
With the batteries charging properly, we were now ready to use them to power all the 12v accessories (lights/fridge/usb’s/water pump) around the van. Each accessory needs it’s own fuse, so the standard method is to run a positive wire from the battery to a fuse panel, which each accessory then plugs into. We used a switch panel with built in fuses, giving us a fuse panel with the option to turn the accessories on and off all in one. It was a simple matter of running positive and negative wires from the battery to the panel, then running the positive wires from each of the accessories to it’s own switch. What about the negative wires you ask? Well every negative wire from each accessory went to a negative bus bar. This is a common place for all negative wires to ground to, which is then connected to the vehicle chassis via a thick earth wire. With all that set up we had lights, charging for our phones and most importantly, cold beers in the fridge!
The last stage of our electrical system was to install the inverter. This converts the 12v from the battery to 240v and gives us a place to plug in things that need a regular house socket to run - laptops/battery chargers etc. This was a breeze to install after everything we’d just gone through! We used a small 200w Pure Sine Wave Inverter that simply clipped onto the battery terminals and that was that! This small inverter was fine for charging small devices, but would be way too small to run blenders, vacuums and other high powered appliances.
Phew! There you have it! A complete electrical setup for a small off grid camper! Everything we installed is basically the bare minimum in terms of power. As we mentioned earlier our fridge was terribly inefficient (was half the price but used 3x as much power as the fridge we should have used) and drained the battery too much after a few cloudy days. If you’d like a hand choosing your set up or need to ask a question, check out here and give us a message!

The Cupboards.
Wrapping up this build are the cupboards we built to be able to store a whole lot of everything! It had an ample closet area where we stored all our clothes. Under that was a pull out table for us to eat, work and play at. This was mounted high enough to still be functional when the bed was made, giving us a place to put our laptop for movie nights! Below that was our underwear drawer which was also accessible with the bed fully made. The very bottom cupboard was for random things we needed with us but wouldn’t need to get out all the time.
The back section of the cupboard was cut lower to allow us to open up the window and get that ever needed breeze into the van. This looked pretty bare as a plain shelf so we got some plants, made a quick little box, and made it look cosier instantly. This back section had 3 levels, with the very bottom being where we housed our auxiliary battery and electrical goodies. Above that was an open shelf where our solar controller was hidden in the back of. We kept towels, extra pillows and random blankets in here. Giving space to the solar controller of course! The top section had 2 big sliding doors where we kept books, camera gear and other random gizmos. We mounted the usb sockets in here so we could plug things in and keep them hidden.

The Ending.
Well, congratulations for making it this far! If you follow us on social media but weren’t around at the time we had Kas, you might be wondering where she is now and why we don’t have her any more?? With a fresh fit out it was only right to jump straight in and take her on a road trip. So we packed the bags, filled the tank, and headed west over the Porters and Arthur’s Passes. The temp gauge got a little high going up the passes, but we pulled over to let everything cool. These passes are damn steep so we weren’t too concerned by this, the radiator did need some proper coolant and probably a good flush. We cooled down and continued on our way. We drove most of the way down the West Coast and had an awesome time, even managing to capture a bucket list shot we’d attempted to capture twice before. It was on the way back up the coast when problems started to occur. . .
The van started and ran fine, but something was wrong with the gearbox and it wouldn’t hold gears properly. We limped onwards to the town of Greymouth to sort out a mechanic who might know what was going on. Unfortunately some places in New Zealand have a dislike for people in vans after years of issues with tourists ruining pristine places. It seemed as though every mechanic we spoke to lumped us in this category, and wouldn’t give us much info or advice to help. Great. We managed to find a dirt cheap tow back over the hills to Christchurch. The van went straight into a transmission specialist to have things accessed. A phone call a few days later gave us the news we feared. . . The gearbox was stuffed and needed a rebuild or replacement. With no replacement to be found, a rebuild was the only option.
Remember how we said this was just a temporary van? Well we just so happened to be looking on a trading site while Kas sat in the shop, when we found a van we for sale never thought we would see in person. Long story short, we ended up buying this new dream van - we’ll have a write up for this when we finally convert it, but check out our Instagram if you want to see it now - and decided to fix Kas up to then sell. A few weeks and a whopping $3000 later, Kas was out of the shop and rolling smoothly again. We cut our losses and put her up for sale for the exact amount we put into her. The new van had us feeling over the moon and we wanted to just remove Kas from the situation so we could move forward. Kas’ new owners flew down from Auckland and drove her off onto new adventures.
All the best Kas, maybe we’ll catch you out on the road one day.