
The Jah Bus
QUICK FACTS.
THE VEHICLE
1987 Hino PMC BX341E
EH700 6443cc Diesel Engine
Alison AT545 4 Speed Automatic
Approx 12m x 2.4m
THE LAYOUT
Full size kitchen
Fixed queen size bed
Full size bathroom and shower
Open plan layout
THE FEATURES
800w of solar panels on custom roof rack
1080ah AGM deep cycle battery bank
Largest roof top A/C available
180L fresh and grey water tanks
Composting toilet
Instant water heater
Domestic fridge and oven
Insulated walls and ceiling
The Beginning.
After renting a small camper to travel through the US on our first overseas trip, we came home with a fresh perspective on what we wanted our life to look like - you’ll find the full story in our About Us. To keep a long story short, we immediately started scouring through trading sites for anything on wheels big enough to live in. Starting small with a van or prebuilt camper would have been the smart idea right? Yeah that’s not how we roll. We wanted a bus. With the choices few and far between, we went and sussed out the couple of buses in the area. After a little research and a couple of inspections, lucky bus number 1242 from Gawler Primary School was in for a new lease of life!

The first day working on the bus. . . blissfully unaware of the nightmare we got ourselves into
The Idea.
When tackling a project of this size, it’s generally a good idea to have a plan of attack. . . that was lesson #1 (of soooo many) for ol’ Goose & Ellen. There wasn’t too much of a plan going into it, we just knew what we wanted our life to look like on the other side. We quickly realised that we were going to need a secure place to store and work on the bus, a whole lot of new tools, and a lot of time to research. Anything worth doing is never easy though, so we set our minds to it and jumped right in! The main goal with this new life of ours was to build an off-grid, self sustainable home on wheels we could travel Australia in search of our slice of paradise to park up on. Queue the floor plan brainstorming!

We started the build on a high and quickly had all the seats out!
The Floor Plan.
Time to let the creative juices flow! With a 12 metre x 2.4 metre blank canvas in front of us, the possibilities were endless. We spent hours watching tours and builds on Youtube, picking apart what we liked/disliked about them. At the end of all the research, there wasn’t really an existing layout that fitted our vision, so we created our own! With Goose being quite a claustrophobic person, the layout needed to feel open and unrestricted. Most bus conversions have the bed at the very back, this leaves no other option except to put the bathroom down one side of the bus, effectively cutting off half of the floor space. After a lot of notepad doodling and taping shapes on the bus floor, we eventually landed on a floor plan that we felt would suit us. Did we stick to it perfectly once we started building? Of course not! If you haven’t noticed yet, we kind of follow our noses and go with the flow.

Here’s the winning layout! Not to scale of course, but gives a good idea of the open plan flow. With big full height items like the fridge and pantry up front and out of the way, the centre of the bus felt open and spacious.
Build Prep.
Before we even thought about building a single thing inside, we wanted to make sure the out shell was completely sound and watertight. Imagine spending a lot of time and money perfecting your interior, only to have a leak appear in the first rain and ruin all the hard work. We were having none of that happen to us! First point of call was to pressure wash the crud off the roof while Ellen noted all the leaking spots inside. As we expected, the old bus was as watertight as a sieve and required a bit of weatherproofing. We set about sealing the joins between the fiberglass panels and took the rain gutters off to refit and reseal. Next step was to remove a few windows where were going to be blocking them on the inside. This way we could insulate the area instead of having big windows that let a lot of heat in/out. We simply drilled out the rivets holding them in, traced the shape and existing holes onto some sheet metal, cut and drilled it out, painted to prevent rust and siliconed/riveted the panels back up. Another quick go over the outside with a pressure washer gave positive results and we were ready to begin with the inside!

The truck dock where we stored the bus was a life saver! No wobbling around on ladders for us.
Skylight Install.
With the bus only having vents in the ceiling, we wanted a way to get up to clean the solar panels or chill for some sunset beers. Replacing one of the vents with a skylight was up next! With the original holes measuring approx. 600x600mm, we were confident we’d be able to find something to drop straight in. . . . we were wrong. All we could find (and afford) was either too big and required us to cut into the bus frame, or too small for us to fit through. Cutting into the bus structure was never an option so the smaller option it was! We created a ‘skin’ of sheet steel to fill in the hole and then made a cutout for the skylight in that. Once this was riveted and sealed to the roof, we whipped up a quick timber frame to support the skylight and mounted that up on the inside. With the skin and frame in place, it was a simple matter of shoving the skylight in the hole, using a whole lot of butyl tape to seal the join, and screwing it to the timber frame to secure. Pro tip - put the hinges towards the front of the vehicle to prevent the wind from ripping the lid off while driving!

Getting small jobs like this done were a great confidence builder! - apologies for the terrible screenshots from our YouTube episode :)
Floor Prep.
After removing the old nasty (and extremely heavy) vinyl off the floor, we were pleasantly surprised to find the timber underneath in pretty good condition. Aside from a couple of soft spots where water had sat from the old leaks, it was sweet as! We patched these up along with the holes from the seats. We wanted to have no troubles with the floor in the future so we took a few steps to protect it. After a quick sand to remove the old glue, we painted on a mould preventer to, well, prevent mould! With that dry we could move on to sealing the timber. We opted for an under tile waterproof membrane. This was like a thick, almost rubber coating that would seal the wood completely and stop any water from coming in contact with it. We chucked down the primer to help it stick, then slapped on a few thick coats of the membrane.
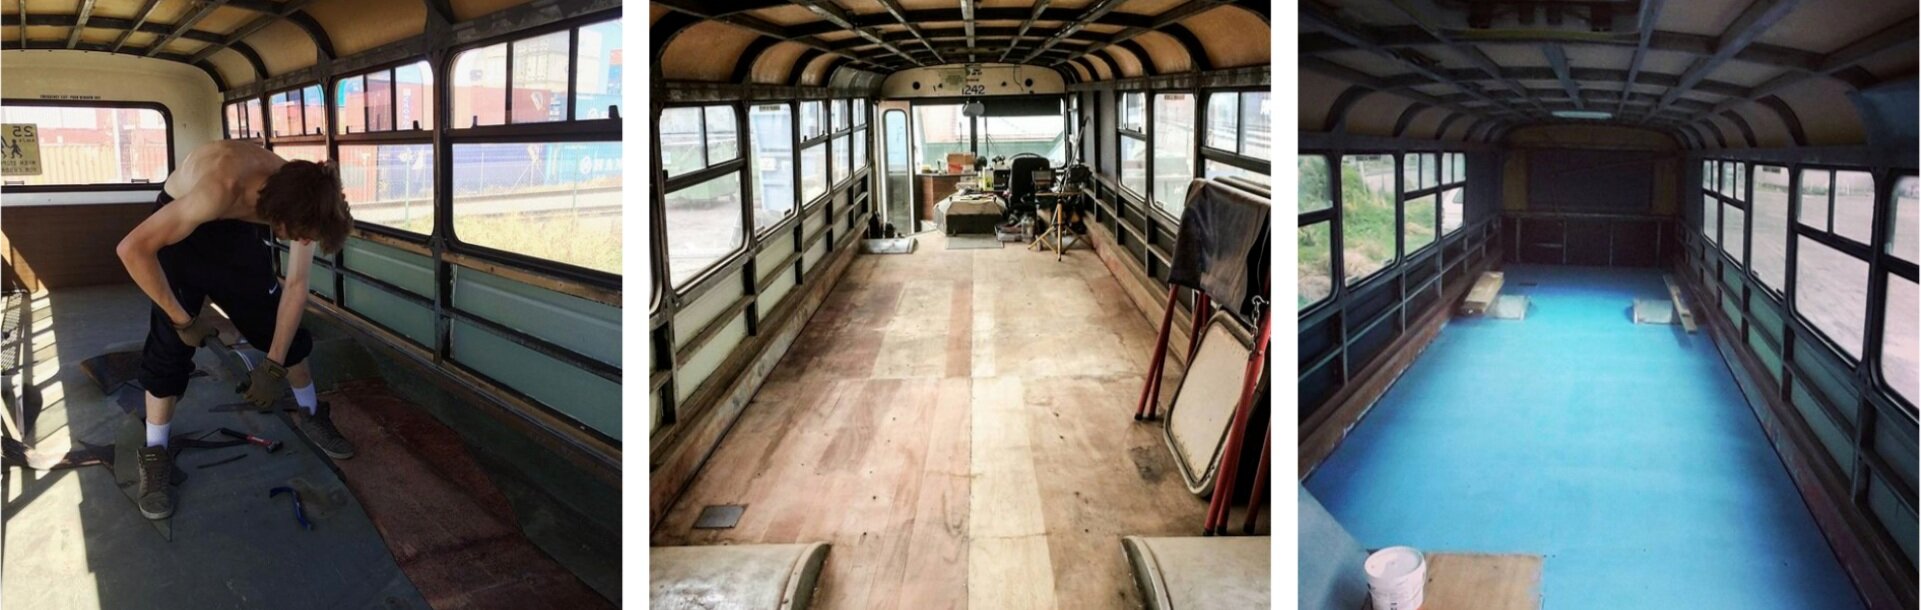
What a difference a clean floor makes! The bus felt so big and open at this stage.
We just wanted to quickly add that we ended up using vinyl laminate planks to finish our floor. They’re hard wearing and easy to clean, water tight, and really easy to install - the reason they don’t have their own section! We simply started in one corner and worked along the floor staggering the boards as we went. The right tool makes them click together much easier!

Insulation.
With all the hard work done to waterproof everything we possibly could, it was now time to weatherproof the bus. With Australia being a literal oven for nearly half the year, and the bus being a literal roasting dish in that oven, keeping as much heat out as possible was a big goal. We researched all types of insulation from standard batts and wool, to old denim jeans and spray foam. The most efficient and cost effective solution we found was high density foam board. It’s light and really easy to work with, doesn’t absorb moisture, it has a fire retardant additive and is also environmentally friendly. We placed an order with a local factory and picked up the goods a few days later! Installing the foam was nice an easy, but did take a while because every section between the frame was slightly different. We measured them to be tight so there was no need for glue or fixings. Unfortunately we weren’t able to insulate the floor due to Goose’s height, but if you have the space we highly recommend.

The amount of heat transfer through the roof was drastically reduced by the insulation.
The Ceiling.
In the interest of keeping things as real as possible, this was no doubt one of the THE WORST JOBS in the bus build. After spending weeks with our arms above our heads, we were feeling the burn in ways we had never before. We used ‘tongue and groove’ pine lining and had an extremely hard time trying to get the boards to slot together. The more the roof curved, the less they would do what we wanted, so much so that we found it easier to cut off the back edge of the groove so we could simply overlap the panels. We also started to sand them after putting them up (big rookie mistake!) and quickly gave that up. Due to the all the issues/difficulties we had putting the ceiling up, it didn’t quite turn out how we had hoped. We should have definitely sanded and prepped the boards BEFORE screwing them up, and would also make them twice as long and stagger them in future to not get a messy join at each section. But hey, you live and you learn! And man did we learn a lot through this build. To make us feel better about ourselves, we quickly insulated the walls and threw up some sheets of ply so we could see some progress!

Although it was a massive pain, it was really satisfying seeing the space come together with the ceiling up. We ended up painting it white to keep everything light, bright and open. Also, why couldn’t we take a single straight photo back then?!
Internal framing.
After the ordeal of putting up the ceiling, our motivation was at an all time low. Anyone who has tackled a project like this as well as working full time will certainly know the ups and downs (often down) too well. We took a bit of time off to explore the local beaches and give our minds and bodies a much needed rest. Queue Goose’s Dad to the rescue! The old boy had some holidays and kindly took it to come over and help us out. This was exactly what we needed to kick us back into gear. With fresh eyes and a different perspective, we finally began building and making the layout come to life. Framing everything out gave us a feel for what it would be like to move around and function in the final space. It’s pretty exciting seeing even the basic outline take shape. With Dads help we quickly had the fridge/pantry and the bathroom wall framed out.

It doesn’t look like much, but getting these walls up gave us the motivation to keep moving! Here’s David, the legend himself ^^
With any project costing thousands of dollars, anywhere money can be saved, you save it! Our neighbour at the time had a heap of aluminium pool fencing that he kindly donated. We put it all to good use and framed anything we could with it - an added bonus was that it’s very lightweight and pretty easy to work with too. We secured the framing to the floor and ceiling with screws and brackets, then skinned them with ply.
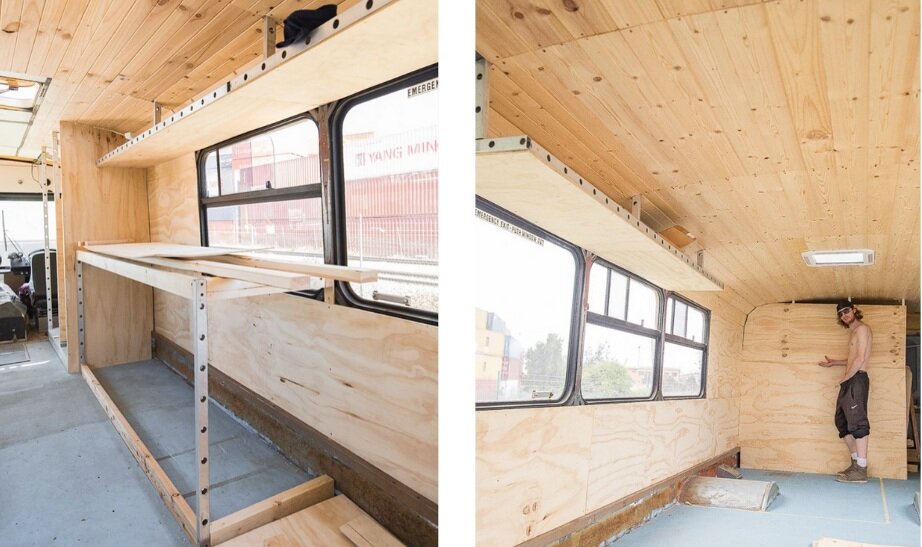
It was at this stage we realised just how difficult it is to build when nothing is straight, level or square! Good old hand made buses ay!
The Kitchen.
As much as we’d like to write this out in the exact order we did things, from here on out we think it’s more valuable to show you each section from start to finish - even though we may have worked on bits of it over several months. Just ignore all the extra things in some of the upcoming photo’s, I promise we’ll come back and cover everything! Anyway, onto the kitchen! Even though we were in a bus, we didn’t want to feel restricted doing every day tasks. Having a proper kitchen and plenty of bench space was a main priority during our layout plan. We already had a regular domestic size fridge so thought we’d try it out and see how well our batteries could power it. It was pretty power hungry and certainly bigger than we really needed, but did work fine for the time we lived in the bus. An upgrade to a decent and efficient inverter fridge was on the cards in the future. Next to the fridge we built a custom pull out pantry to save on space. It was something we hadn’t really seen in other buses at the time, and is now a staple in most conversions. This was a basic frame from the aluminium, again skinned with ply. We then attached some heavy duty drawer slides to the base and a face to make it pretty.

Simple, clean and functional. We loved our little bus kitchen!
After looking into the sizes and prices of caravan specific ovens, we were quickly researching other alternatives . . . Turns out household ovens are legal to use in Australia! (when installed by a professional). We waited for an appliance sale and grabbed ourselves a brand new oven that’s actually a usable size and a third of the price of a RV oven. We rough mounted this to be installed fully when we had the other LPG appliances sorted. Speaking of which, we installed our instant hot water heater under our kitchen sink to keep all the gas appliances in one accessible area. We’ll discuss this in more detail in the plumbing section. To finish off the kitchen area, we installed a low profile range hood above the oven, our Ikea concrete look bench tops and fitted our huge (and honestly too big) sink and faucet. On the opposite side of the bus to our kitchen area, we had a 2 metre long bench to use as extra cooking/workspace, a place to sit and eat our meals, and most importantly where our battery bank and electricals were housed. Let’s check out the power behind the bus!
THe Electrical System.
Arguably the most important and expensive part of any off grid build, the electrical system of the bus was a big worry hanging over my (Goose’s) head for a lot of the build. I’d had absolutely no experience wiring anything so this was a big learning curve, and with sooo much information out there, a difficult one at that. It wasn’t until I decided to just have a crack at it that all the stuff I’d read started to make sense. At the end of the day, it was a simple matter of following the installation instructions for each component and taking my time. Any off grid setup will consist of a few main components, here’s the basics:
Solar panels - The things that generate electrical power from the sun. Choose monocrystalline panels over polycrystalline for efficiency. Fit as many as you can afford, leaving room for more down the track. You can never have too many panels!
Solar controller - The thing that controls the power generated by the panels. This is essential to ensure you’re safely charging your batteries. Choose MPPT type over PWM for efficiency. Choose a controller that can handle more input than your panels will produce for longevity of the product and the option to add more solar if needed.
Batteries - The thing that stores the power generated by the solar, and then uses that power to run all the 12v ‘loads’ or electrical items. AGM deep cycle batteries are the industry standard these days, if you have the money then Lithium or LiFePO4 batteries are well worth the investment in the long term.
Inverter - The thing that turns the 12v of the batteries into 240v for the use of household items with standard wall plugs. Choose a Pure Sine Wave over Modified for efficiency. Again go larger than the output loads, less stress on components mean they’ll be reliable for years to come.
DC-DC Charger/VSR/Battery Isolator - The thing that charges the battery bank from the vehicles alternator while driving. There’s options to choose from to charge while driving, while we didn’t install one on the bus, we highly recommend installing one especially if you’re constantly on the move. Free power baby!
Fuses - The things that protect individual components and prevent your home from burning down! Installing the proper fuses in the right place is extremely important for safety. Every component will specify the size and location of the fuses needed, these are a must!
Cut off switches - The things that cut power to specific components. These aren’t a must, but they’re definitely handy for cutting power to or from components if you need to work or replace another part of the system. I usually use them between the solar panels and charge controller, as well as between the battery bank and fuse block for the lights/usb outlets/water pump etc.
While I could definitely add A LOT more info in this area, this is purely to give some info on what we did in our build and not a complete How To. We’ll have an in depth write up on everything you need to know to set up your own electrical system coming soon!

Lets start up on the roof with the solar panels. We invested in 4x 200w Monocrystalline panels, giving us a total of 800w of sun soaking power! With the bus roof being curved and both of us being too nervous to put a lot of holes in it, we opted to build a custom rack bolted through side of the bus frame. We bunched them all at the front for a few reasons - 1. To keep the rest of the roof clear for more solar and a potential roof deck in the future - 2. To have only one point of entry for the wires, near the battery bay - 3. To enable us to park most of the bus in the shade, keeping the living area cool but still getting full solar power. With the panels mounted and the wires run down to where the batteries were housed, we could look at starting to wire the components together.

One of the greatest feelings of achievement in the whole build. Love me a good solar array!
Next up was to set up the battery bank. We went BIG with this part of the system, purely because we wanted to have more than we needed (and also wanted to attempt running the A/C solely from solar power). The bank consisted of 4x 270AH Deep Cycle AGM batteries, wired in parallel to gave us a whopping 1080AH of battery power. Using the manufacturers spec sheets I found the recommended wire size/length ratio and then went one size thicker, all in the effort to reduce voltage drop as much as possible. Make sure you keep even weight distribution in mind as well! At over 70kgs each, batteries like this can easily throw the handling of your vehicle off if not put in the right spot.

After setting up the battery bank, it was time to get some power coming into them to charge. Time to install the Solar Charge Controller! Like with the rest of our electrical system, we went overboard and purchased a 60A MPPT controller that could easily handle our current solar array and much more. A word of warning here for those wanting to cheap out and save money on the electrical components . . . . DONT DO IT! The solar controller we chose was cheap, had no reputable brand, and nearly caused our batteries to explode and burn our whole bus down. You really do get what you pay for with electronics online. Do your research and use trusted brands with good quality products.

The culprit that nearly cost us everything we owned. . . After replacing with a solar controller from a local store, we were back in business and confident we wouldn’t have any more issues
After connecting the controller to the batteries, then connecting the solar panels to the controller, we were charging nicely and ready to start using the batteries to power things around the bus. With most of our electrical components being 12v, we could simply run a positive wire from the batteries to a fuse block, and then run all the circuits from there. The 12v components we used were: the downlights, the usb sockets, the water pump and the range hood. The final step in the electrical system was to hook up the inverter to give us 240v like the wall sockets in your house. We saved the easiest for last, with this only needing 2 wires and a fuse hooked up for it to run. We chucked it in, ran an extension cord to a multiplug, and plugged the fridge straight in to cool down some hard earned beers!

This big unit had enough grunt to power our full size fridge, our record player, laptop and camera chargers, blenders and a whole lot more. We were even able to run our roof top A/C from this. . . . until the batteries drained too low.
The living area & bedroom.
Yeah we’re weird, we put our bed in the main area of the bus in full view of everything. BUUUUT . . . We really love our bed! We had a full lounge suite and living room set up in our past houses, but found we spent all our time chilling in bed instead (yes we ate in bed too, we’re admit we’re grubs). We figured anyone who would be in the bus with us we’d be close enough with to share all around them hahaha. Anyway, the living area consisted of a 2m long couch that pulled out to a double bed, a seating area at the bench for eating and working, and a small shelf at the end of the bench where our records player and vinyl’s were kept. The ‘bedroom’ included the double mattress we already had, which sat on a custom frame raised off the ground. Giving us a huge storage area. We built the frame to hinge up to access underneath, but also built some drawers in the hallway side to give easy access to our daily clothes. Ooooh I almost forgot! . . . . A lot of people struggle with creative ways to cover up the wheel wells. We had a genius idea (if we do say so ourselves) to turn this into a little bridge feature. It turned into a great spot for kitty photo shoots! haha.

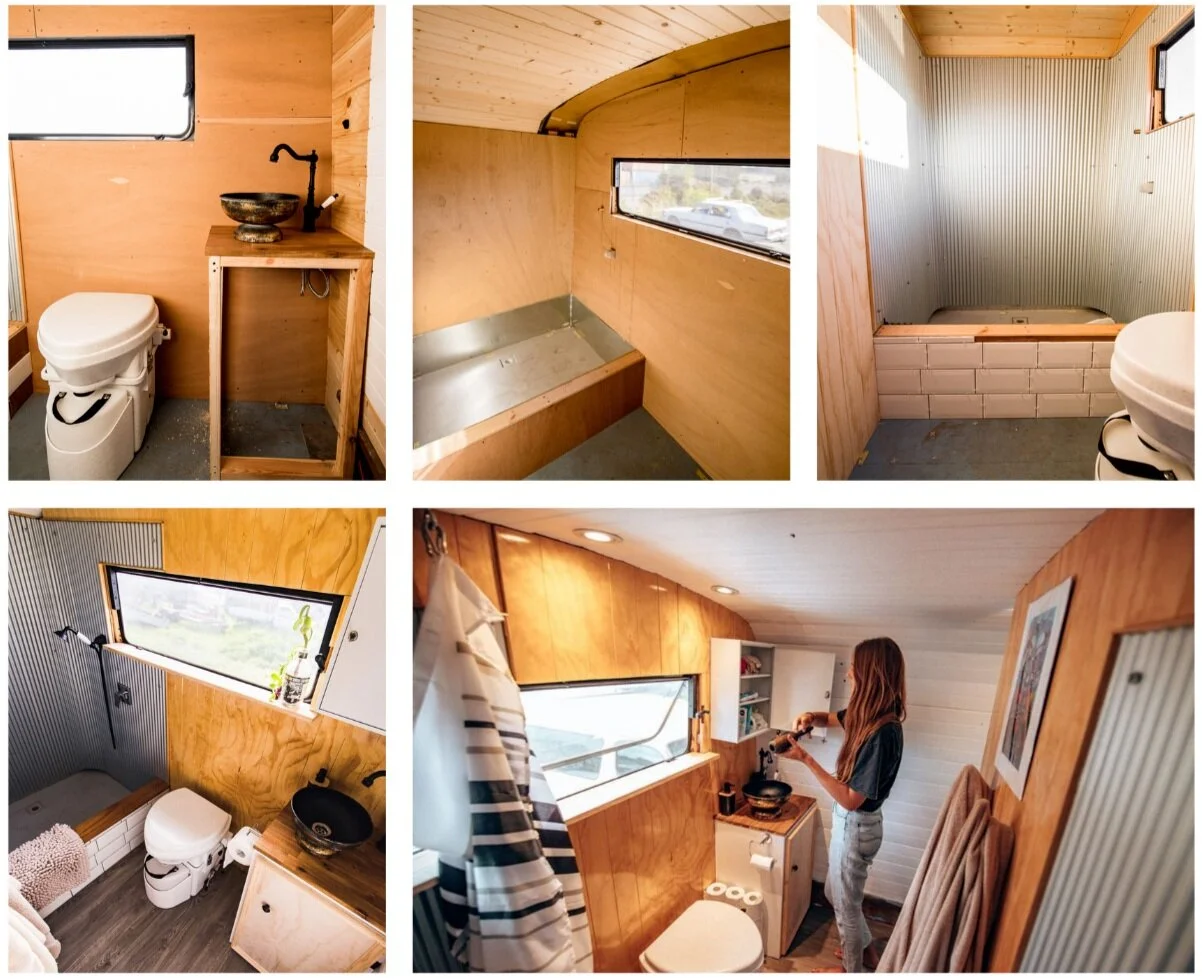
The bathroom.
Putting the bathroom at the back of the bus was another unique idea at the time we built it. With most other bus conversions usually putting the bathroom down one side, we wanted to do something different that would also be functional. In doing so we were able to have as much space in our bus bathroom as one in a regular house. We found a 900x900mm shower tray for cheap and used this to base our layout from. We lined the area with marine grade ply to prevent mould issues down the track, then covered it with corrugated iron so it looked the part. Next to the shower was our Nature’s Head composting toilet. Yes they’re bloody expensive, but it honestly worked perfectly for our set up. There was no smell, no gross black tanks to empty, and they’re super easy to install! The last touch in the bathroom was a little sink made from a fruit bowl, with a black faucet and a little cupboard for storage.
The Plumbing.
Plumbing has to be the most exciting section of any skoolie conversion! . . . . said no one ever. Yes while it’s not the most glamourous or insta worthy part of the build, it’s pretty bloody necessary. Despite having absolutely no experience with plumbing we thought it would be pretty easy, I mean, as long as the pipes are on a slope everything will flow right? While that is the case, we found that we spent the most time out of any project standing in front of the the shelves at Bunnings trying to find parts that fit together. It was surprisingly difficult to make what should be a simple waste fitting work. Maybe we were doing it completely wrong?!
For our water storage (both fresh and grey) we used 2x 90L water tanks modified and strapped together to work as one 180L tank. We didn’t do any calculations to figure out our water usage vs storage capacity, but we found 180L lasted us a week while we were still living the normal 9-5 life (showers every day and cooking/dishes etc). We mounted the tanks in some simple custom steel frames under the bus, the fresh tank in the middle on the drivers side, the grey tank in the rear near the shower drain. To move the water around the system we used a 12v Shureflo water pump mounted under our sink (and near the fresh tank). If a silent water pump exists we’d love to know about it!, but otherwise your stuck with something that growls every time you turn the tap on. From the pump we ran a T intersection, one branch off to all of the cold inlets at the kitchen and bathroom taps, the other branch plumbed through the Camec Instant hot water heater and then to the hot side of the taps. For all of these we used coloured PVC piping with John Guest push fittings - these were really easy to use and gave a strong secure join. We also ran thicker diameter tubing in the long runs of pipe, then reduced it to a smaller diameter for better pressure at the taps. As we mentioned earlier with the oven install, we needed the LPG pluming to both the oven and water heater to be done and certified by a professional. We mounted the water heater and plumbed the waterlines ourselves, then sent the bus off to a caravan shop for the LPG plumbing. After that was sorted, we could finally cook and clean in the bus! We were now basically a fully functioning home.

The only shots we have of the hot water heater (1st & last) and water pump (middle)
The Air conditioning.
Living in a bus in Australia? Yeah you’re gonna need air conditioning! That’s why we went with the biggest rooftop unit money could buy - the Dometic Harrier. Now while this was the biggest we could find, it was still a little underrated for the size of the bus. That being said, it still saved our bacon on those 40+ degree days. Our aim when designing the bus and more specifically the electrical system, was to be able to run this air con solely from our batteries and solar power. While we were able to do this for a short period, the amount of power needed for the A/C to keep up with the heat was more than the solar panels could pull in. If we used the A/C how we wanted, the batteries would be drained to half in an afternoon and would take a few days to get back to full again. Running A/C from solar is doable but does require a big battery bank AND solar array.
Installing the A/C was straight forward with no new holes needing to be cut in the bus roof. We chose to mount the A/C in hole for the old escape hatch and like with the skylight, we needed to build a frame and use a piece of sheet metal to cover the larger hole. Because the A/C weighs a bit (around 40kgs) we welded in a steel “H” frame between the bus ribs with the opening size to suit. We then cut the sheet metal larger than the hole in the roof with a hole in the centre to match the frame. Once this was painted and riveted/sliconed to the roof, it was just a matter of dropping the A/C on top of the hole, siliconing the join and screwing in the mounting collar from the inside. We never completed the wiring properly for it, but we temporarily attached a 240v plug to the 3 wires of the unit so we could plug it and run it directly from our inverter.

The storage bins.
With sooo much useable space under the bus it was silly not to do something with it. Because of this we decided to build some storage bins in the middle of the bus on the door side. This is were we stored our LPG bottles, hoses for fresh and grey water, our tools, and a whole lot of random crap! They weren’t the easiest things to fabricate as I had no welding experience, but they definitely held up find and did the job perfectly. We started by cutting out the skin of the bus where we wanted the bins to go. We just cut in-between the bus frame so we could use that to mount the bin frame and doors to. The bin frame was made from angle iron welded together, then lined with marine ply to create the box. We also painted the outside of the box with thick car underbody spray to weather seal it. We drilled holes in the bus and bin frame and then bolted the two together. We used timber from an old gate to make the doors. Simply cutting lengths and then bracing them with some cross pieces. A lockable handle and a few hinges later and we had a secure place to store things! FYI for the LPG storage, this bin needed to be lined with sheet steel and be vented to comply with the gas fitters regulations. The guys at the RV store did this for us when fitting the gas lines!

The Ending.
Time to wrap things up with a summary of our journey with The Jah Bus and where it ended up. In total, we spent a year and a half building, moved in (with a few small jobs to finish) and lived fully off grid for a year and a half, then sold the bus to move back home to New Zealand - full details about why in the About Us. The time spent living in the bus is definitely a proud moment in our lives. We created a home out of nothing and it worked! We found a cheap place to park it and instantly started saving hundreds of dollars a week not living in a rental property.
The decision to sell the bus was extremely difficult. We were pretty stubborn and wanted to stick with what we had put so much time into creating. As soon as the ad was up there was a lot of interest, but we didn’t want our baby just going to anyone. Pretty quickly a couple up in Darwin (very top of Aus) contacted us and were dreaming of one day owning our bus. The only ‘downside’ was they couldn’t get down to Adelaide (very bottom of Aus) to view or buy. Ellen and I looked at eachother. . . . This was the perfect situation for us! What better way to say goodbye to our rolling home than to take it on it’s first roadtrip through Australia’s great red centre. The new owners now live in it on their families land and are prepping it to be full time road ready! Check em out at 1242 Bus.

A few pics from The Jah Bus’ epic roady, and one final shot with the new owners. All the best Lochie, April and Monte